Notes & Collaboration
Fallback recommended. Notes sync across devices, but keep a fallback for show-critical notes.
Document every moment with real-time rich text editing.
Overview
The Notes tool is your collaborative workspace for production documentation:
- Rich text editing — Full formatting with TipTap editor
- Real-time collaboration — Multiple users edit simultaneously
- Report templates — One-click rehearsal and meeting reports
- Editable tables — Add structured rows and columns directly inside notes
- File attachments — Attach project files directly inside a note
- Outline and report map — Jump between headings, department sections, and timestamped report entries
- Transcript rail — Capture in-person audio transcription, insert sourced transcript cards, and review speaker labels
- Snapshot history — Save and restore editor checkpoints with pre-restore safety copies
- Import and export — Import plain text and export the current note as Markdown
- Stopwatch timer — Built-in timer with timestamp insertion
- Floating editor — Detach your window for multitasking
Getting Started
Opening Notes
- Navigate to Notes in the sidebar
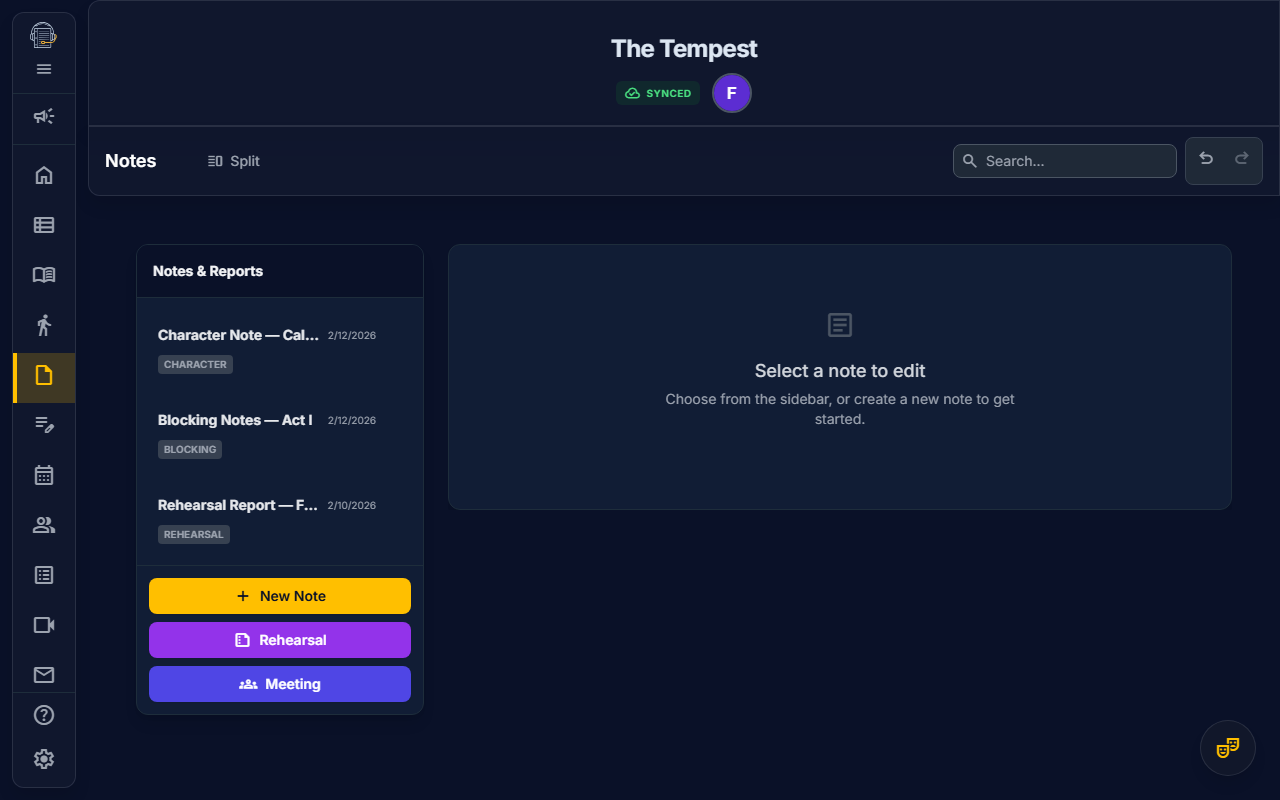
- You'll see the notes list on the left and editor on the right
Understanding the Interface
| Area | Purpose |
|---|---|
| Notes List (left) | All your notes, sorted by date |
| Editor (right) | Rich text editing area |
| Toolbar (top) | Sticky formatting tools and actions inside the editor pane |
| Outline (right) | Report map and document headings |
| Transcript Rail (right) | Live or archived transcript segments for the selected note |
| Stopwatch (floating) | Timer with timestamp insertion |
The Notes toolbar stays pinned at the top of the editor pane while you scroll a long note, so formatting, table, document, history, import/export, undo/redo, timestamp, and stopwatch actions remain close to the writing surface.
On phones, the Notes toolbar keeps block style, bold, italic, and a More button in the top row. Secondary tools such as underline, highlights, lists, tables, attachments, outline, history, import/export, undo/redo, timestamps, and the stopwatch live in the More sheet so the editor stays usable without a sideways-scrolling toolbar.
Type @ in a note to open mention search. The list includes report buckets such as Props, Costume, or Stage Management, and current project people from Personnel, so notes and reports can reference both departments and named collaborators.
Creating and Managing Notes
Creating a New Note
- Click "+ New Note" in the sidebar
- Enter a title
- Start typing in the editor
Organizing Notes
- Rename: Click the note title to edit it
- Delete: Click the trash icon on hover
- Reorder: Drag notes to reorder in the list
Rich Text Formatting
The editor supports full formatting:
Text Formatting
| Format | Shortcut | Toolbar |
|---|---|---|
| Bold | Ctrl+B | B button |
| Italic | Ctrl+I | I button |
| Underline | Ctrl+U | U button |
| — | S button |
Headers
- H1: Large section headers
- H2: Subsection headers
- H3: Minor headers
Lists
- Bullet lists: Unordered items
- Numbered lists: Ordered sequences
- Checklists: Interactive checkboxes
Other Elements
- Block quotes: Highlighted quotations
- Code blocks: Monospaced text for technical content
- Horizontal rules: Visual section dividers
Right-click Editing Menu
Right-click inside the note body to open the editor menu at your cursor. The menu mirrors the core toolbar actions for formatting, highlights, lists, action-item flags, tables, document actions, and undo/redo. If you right-click an action-item-capable block, editors with Notes permission can flag or clear that block directly from the menu.
Tables
Use the table button in the toolbar to insert a default 3-column by 3-row table with a header row. When your cursor is inside a table, extra toolbar controls appear for adding columns, adding rows, deleting columns, and deleting the table. Tables are saved with the note and work in collaborative editing sessions.
Attachments, Outline, and History
Attaching Files
Use the Attach File toolbar action to add project files inside a note. You can upload new files or choose existing Cloud Files. Attachments preview through the Files viewer when available; if the file is restricted or unavailable, On Book shows a warning instead of opening a broken preview.
Outline and Report Map
The outline panel can show:
- Report Map groups from leading department mentions and timestamped report entries
- Document Sections from note headings
Click an outline entry to jump back to that part of the note. Use the outline toggle in the toolbar if you need more writing space.
Generated rehearsal reports recognize timestamp chips and typed leading wall-clock times such as 19:30 or 7:30 PM. When a rehearsal note line starts with a wall-clock time, the report treats that time as a schedule entry and strips the repeated time from the entry description.
Transcript Rail
Use the transcript toggle in Notes to open the transcript rail for the selected note. Notes-owned transcription is intended for in-person audio capture, table work, and production meetings where a searchable source record helps the report writer.
From the rail, editors with Notes permission can:
- Start or stop a Daily transcription session tied to the active note
- Watch live transcript segments while the session is running
- Insert a transcript segment as a source reference card in the note
- Flag a segment as an action-item suggestion with transcript evidence attached
- Correct speaker labels through the attribution modal
- Follow transcript evidence links back to the referenced segment
The readable note content and the preserved source transcript are stored separately. Hiding the rail does not stop an active recording; stop transcription intentionally when the audio session is finished.
Snapshot History
Use History to save an editor checkpoint or restore a previous one. When you restore a snapshot, On Book first saves a safety copy of the current editor state so you can recover if you picked the wrong checkpoint.
Import and Export
Use Import Text to insert pasted plain text into the current note. Use Export Markdown to copy the current note as Markdown for sharing, archiving, or moving content into another system.
Report Templates
Rehearsal Report
Generate a professionally formatted rehearsal report:
- Click "Generate Report" in the toolbar
- Select "Rehearsal Report"
- The template populates with:
- Date and call time
- Attendance section
- Work accomplished
- Notes for departments
- Schedule for tomorrow
Meeting Report
For production meetings:
- Click "Generate Report" → "Meeting Report"
- The template includes:
- Date and attendees
- Agenda items
- Discussion notes
- Action items
- Next meeting date
Customizing Templates
Templates create structured starting points. Edit freely to match your needs:
- Add or remove sections
- Change headings
- Insert additional content
Reviewing Recipients
Before emailing or posting a rehearsal or meeting report, On Book Pro opens a report review modal. The review includes a print preview, selected audiences, deliverable recipients, missing-email contacts, and recipients excluded by opt-out or one-send removal.
- Rehearsal reports default to the Production Team audience
- Meeting reports default to the selected or inferred meeting attendees
- You can choose standing audiences, connect a meeting, remove recipients for this send, or add a one-off external recipient
- Use Print, Save without sending, Post Report, Get Link, or Send Report from the review step
When a rehearsal or meeting report is posted or sent by email, On Book can preserve the full report body as a hosted report artifact and store the published report metadata with the note. The email itself stays concise, includes the scheduled call for that rehearsal day when one is available, and lets recipients open the report link for the complete printable version. After a report has been posted, Get Link creates a fresh share link for the same durable report artifact without resending the email.
Meeting reports use the linked meeting as their report context. The review step keeps the selected meeting attached, renders meeting details instead of rehearsal call details, lists selected meeting attendees in the report body when available, and publishes through the same hosted report link flow as rehearsal reports.
Stopwatch Timer
The built-in stopwatch helps track rehearsal time:
Using the Timer
- Click the stopwatch icon to show the timer
- Click Start to begin timing
- Click Pause to stop temporarily
- Click Reset to clear the timer
Inserting Timestamps
While the timer is running:
- Click "Insert Time" in the timer panel
- A timestamp pill (e.g.,
⏱ 12:34) inserts at your cursor - Use this to log key moments during rehearsal
You can also type a leading wall-clock time at the start of a rehearsal note line when you need the generated report schedule to use the actual call time rather than stopwatch elapsed time.
Use Cases
- Track scene run times
- Log when issues occurred
- Document break lengths
- Time costume quick changes
Floating Editor Mode
Detach the editor for multitasking:
How to Float
- Click the "Float" button in the toolbar
- The editor opens in a draggable window
- Position it anywhere on screen
- Continue working in other tools while editing
Returning to Docked Mode
- Click "Dock" in the floating window
- Or close the floating window
This is especially useful for:
- Taking notes while reviewing blocking
- Writing reports while checking the schedule
- Documenting during live rehearsal
Real-Time Collaboration
Multiple team members can edit simultaneously:
How It Works
- Changes appear instantly for all collaborators
- See other users' cursors in real-time
- No conflicts—CRDT technology merges edits automatically
Collaboration Tips
- Communicate: Let teammates know when you're making major edits
- Use headings: Makes it easier to work in different sections
- Check presence: See who's online in the header
Keyboard Shortcuts
| Shortcut | Action |
|---|---|
Ctrl + B | Bold |
Ctrl + I | Italic |
Ctrl + U | Underline |
Ctrl + Shift + 7 | Numbered list |
Ctrl + Shift + 8 | Bullet list |
Ctrl + Z | Undo |
Ctrl + Shift + Z | Redo |
Ctrl + S | Save (auto-saves anyway) |
Tips for Success
emoji_objects Use templates — Reports start polished, customize as needed
emoji_objects Timestamp key moments — The timer creates a running log
emoji_objects Float for multitasking — Keep notes visible while working
emoji_objects Collaborate live — Real-time editing replaces email chains
emoji_objects Print regularly — Generate PDFs for your binder
Printing Notes
Export notes for physical binders:
- Click Print in the Action Toolbar
- The note formats for clean printing:
- Title as header
- Proper margins
- Page breaks where appropriate
Video Tutorial
Video walkthrough: planned.
Related Guides
Last updated: May 2026